
Tips for Planting the Summer Vegetable Garden
- Sarah
- Apr 30
- 8 min read

Here in southern New Mexico, we pass our last frost date near the beginning of May, so it is time to prepare and plant the summer garden. We've been gardening for over 16 years, and in that time we have learned many lessons on what makes gardening successful here.
Every location has its own unique challenges, yet there are some basics that every garden needs, including good soil, the right amount of water, and plenty of sunshine.
Here is a snapshot of the overall process we use for gardening:
Plan the plants: types of vegetables and fruits to grow, companion plants, and flowers to attract pollinators
Plan for plant placement in the garden
Set up the watering system
Prep the soil and add compost
Plant the seeds and vegetable starts
Mulch to conserve moisture
Watch it grow, weed daily, and enjoy the harvest!
Plan It Out
Each year, before we start planting, we take a little time to plan out the garden. When it comes time to actually plant, there are always a few deviations from the plan, but the initial planning gets us started in the right direction. When planning our garden, we make sure to do each of the following:
Take stock of old seeds - We have found that most of the old seeds from previous years will still work well in our garden, even for a few years past their "Best By" date. With older seeds, the germination rate goes down, so you may want to plant a few extra seeds to ensure that you end up with the right number of plants.
Plan for companion plants - One way to help plants thrive is to plant "companion" plants which are mutually beneficial to each other. For instance, tomatoes will benefit from being planted near parsley and dill, and would enjoy the afternoon shade offered by sunflowers. Basil likes to be planted near tomatoes. For more ideas, check out my article on companion planting with herbs.
Plan for flowers - Besides being beautiful, flowers will attract beneficial pollinators to your garden, thereby helping to ensure that you will have a fruitful harvest. Zinnias, marigolds, and sunflowers are among our favorite flowers to include in our vegetable garden.
Get a rough idea of plant placement - In order to thrive, gardens generally need at least 6 hours of sunlight per day. Although we've tried experimenting with raised bed gardening and container gardening, we have found planting in the ground to be our most successful method for summer gardening. Based on the expected size of each type of plant, we make a rough plan of where different types of plants will be located. To reduce pests and diseases, we also make sure not to plant the same type of plants in the same location year after year.

Set up the Watering System
Where we live, the yearly rainfall is only 8-11 inches so supplemental watering of the garden is absolutely required. If you live where there is ample rainfall, you won't need to worry about this.
I have experimented with many different types of watering systems for our garden. Here are some pros and cons of each type.

Watering Tips for Desert Gardens with Sandy Soil
The watering method that has worked best for us is to use a sprinkler. The sprinkler comes on in the early morning before the heat has arrived in order to conserve moisture.
I always use an automatic water timer for our garden. Otherwise, our whole garden can fail from just one day of forgetting to water. During especially hot spells, I may need to add in a second automatic watering time around 4-5pm if the plants are all drooping from the heat and water loss.
We can also get by with using soaker hoses for our garden. This only works if we use extra long hoses so we can wrap them around our plants multiple times. Drip irrigation has NOT worked well with our soil. (In areas where the soil has more natural humus or clay content, drip irrigation may be a good match.)
It works best for us to set up the watering system BEFORE we plant our garden. That way we can tell exactly where the water will be applied and make sure not to plant anything outside of the moist zone.

Prep the Soil and Add Compost
Good soil is key to a flourishing garden. The ideal soil will have plenty of nutrients for the plants, will drain away excess water to prevent root rot, and will also retain enough moisture to keep the plants from drying out too much between waterings.
Although I have experimented with several no-till methods, I generally find it beneficial to turn over the dirt in my garden annually down to a depth of about 12-18 inches. This ensures that the ground is not too hard-packed so that roots can easily grow, and it also helps to mix nutrients evenly into the soil since certain areas may have been depleted by previous plantings.
For most of our gardening history, we have manually turned over the soil with shovels and lots of hard work. For the last couple years, we have used a Sun Joe electric garden tiller and that has dramatically reduced the time and effort required to prepare our soil.


Overly sandy soil drains too quickly and the plants can dry out too much, whereas areas with a high clay content in the soil can have the opposite problem of draining very slowly and becoming very hard-packed (which makes it hard for roots to grow). Since the native soil in my garden area is very sandy and highly alkaline, we amend it each year to improve its nutrient-content and water retention. Compost and peat moss are both excellent additions to our garden soil. (In places where the native soil is acidic, peat moss would not be a good addition to garden soil because it is highly acidic.)
Compost is my favorite soil amendment, as it adds many nutrients to the soil as well as humus (which helps with water retention). Compost can be expensive if purchased by-the-bag, but by having an active compost pile it can be produced at home with vegetable scraps and yard waste. Another good option to check into is whether or not there is compost available at the city landfill. In my area, we can get compost for free at the city landfill.
At our house, we let our chickens do the work of composting for us. Using a method I learned about in The Small-Scale Poultry Flock, we have deep mulch in our chicken coop, which consists of leaves and other dried vegetation from around our property. The mulch combines with kitchen scraps and chicken manure to make compost. The chickens do most of the work of turning and mixing the compost. Because we live in the desert, we do need to water the mulch semi-regularly in the hot months to ensure that the compost is moist enough. With this deep mulch method, we are able to harvest 8-10 wheelbarrows full of beautiful compost to be used in our summer garden every year.

Each year, we add more compost to the garden so that over time, our garden soil is improving year by year. One caution when using compost is to make sure that it is fully composted before planting vegetables in it to ensure it will not burn the seedlings. A good general rule of thumb is to amend the soil with compost and then wait 1-2 weeks before planting.
Plant the Seeds and Vegetable Starts
Once the soil is ready, we can start planting! Seed packets for each type of plant include instructions for how deep to plant the seeds and how far apart they should be spaced.
Some plants, like tomatoes, are planted individually with plenty of space between plants. Other plants, such as corn and beans, are planted in rows. And then squash, cucumbers, and melons are planted in hills.
We typically plant everything from seed except for tomatoes. When transplanting tomato plants, it is a good idea to plant them much deeper than other seedlings. The bottom of the main stem (which includes some leaves) should be buried in the ground. This will give the tomato plants a head start as roots will grow off the main stem.

Over the years, our warm season garden has included:
Squash: zucchinis, yellow squash, butternut squash, acorn squash, pattypans, and spaghetti squash
Tomatoes: Super Sweet 100 is our favorite cherry tomato, and Early Girl is our favorite standard size tomato (NOTE: when temperatures are in the upper 90's/100's, most standard tomatoes will not set fruit, but the cherry tomatoes will continue to thrive)
Pumpkins: Sugar Pie and jack o' lanterns
Okra
Corn
Cucumbers: Pickling cucumbers have grown the best here in our hot dry climate
Sweet Potatoes
Melons: cantaloupe and watermelons (Moon and Star watermelons have grown best for us)
Carrots
Bush Beans
Swiss Chard
Basil, Thyme, Parsley, Oregano, and Rosemary
Make it Beautiful with Flowers

Planting flowers in the vegetable garden makes the garden beautiful to look at and it aids the vegetables, too. For instance, sunflowers can provide late-afternoon shade for tomatoes, marigolds can benefit strawberries, and zinnias can attract lots of beneficial pollinators. Nasturtiums are also great to plant as bugs are more attracted to them than to the veggies. My daughter, especially, loves to plant lots of flowers in our summer garden.
Mulch
Once our garden has started growing well, it is highly beneficial to apply a layer of mulch to the garden. Mulch helps to keep the ground from drying out too much, and it also keeps the plants off of the moist ground.
We have successfully used alfalfa hay, shredded wood, broken down sticks/vegetation from our property, and pine needles as mulch in our garden. If we are using soaker hoses, one key is to make sure that we apply the mulch over the top of the soaker hoses, which allows the moisture to be retained very well in the ground.
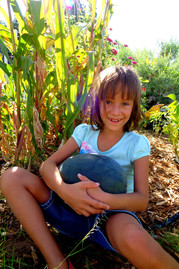
Get the Kids Involved
Gardening is an integral part of our homeschool curriculum. When kids are involved in the garden, they gain an appreciation and understanding of where their food comes from. It teaches them about the life cycle of plants, helps them learn responsibility and persistence, and gives them skills for their own gardening endeavors as they grow up.
My children have each had their own gardening space in our family's garden since they were 3-years-old. As they grow older they are given larger areas to garden in each year. Many family memories have been made when we are working alongside each other in the family garden. And my children are immeasurably proud when they get to harvest food for our table from their own gardens.


Watch it Grow, Weed Daily, and Enjoy the Harvest
Once our garden is planted, it's time to enjoy watching it grow until the foods are ready to harvest. Daily weeding is essential, especially for the first couple months as the garden plants are getting established and claiming their own territory.
Years ago, a friend gave me the great idea to keep a gardening journal. Each year, I record what was planted, when it was planted, and how it fared. This helps me keep track from year-to-year of what worked best, which specific varieties did not tolerate our climate well, etc.
Vegetable gardening is a beautiful and healthy way to be involved in the production of healthy foods. It allows us to celebrate the seasons as we observe the cycles of growth, abundance, and decay. For our family, gardening is a tradition that enriches our lives as well as our relationships with each other and our land.


Do you have a vegetable garden? What are your favorite things to grow?
Links to Amazon are affiliate links. If you use these links, your price remains the same, but I earn a small commission. Thanks for supporting this site!